Free Shipping available on orders $299 & up!Shop our Specials»
  • Business Icon For Business & More icon arrow
    • Creative, Production & PostCreative, Production & Post
    • Corporate & EnterpriseCorporate & Enterprise
    • Higher EducationHigher Education
    • State, Local & K-12 EducationState, Local & K-12 Education
    • House of WorshipHouse of Worship
    • Systems IntegratorSystems Integrator
    • HealthcareHealthcare
    • Federal, State & Local GovernmentFederal, State & Local Government
    • Join Today!

      Already registered? Sign In

  • Region: Canada icon arrow
    • Select your preferredcountry / region:

    • USA RegionUSA + International
    • Canada RegionOWC Canada

    • Experience local shipping options and optimized product inventory for your region.

  • Phone Icon1-800-275-4576
  • Intl: 1-815-338-8685
MacSales.com Powered By OWC
Site Search
  • Blog
  • Support
  • Account
    • Hello, Sign In
    • My Account
    • Order Status
    • Write A Review
    • Warranty & Returns
  • Cart
MacSales.com Powered By OWC
  • Support
  • Chat Contact
  • Account
    • Hello, Sign In
    • My Account
    • Order Status
    • Write A Review
    • Warranty & Returns
  • Cart
  • Specials & Featured
  • Rocket Yard Blog
  • Chat
  • Support
      • Shop All
        • Internal Drives
        • External Drives
        • Apple & Macs
        • Docks & Connectivity
        • Cards & Readers
        • Batteries
        • Software & Apps
        • Cables & Adapters
        • Memory
        • PCIe Expansion
        • Specials & Featured
        Tech Support Home
        OWC Downloads
        OWC Manuals / Optical Drive Installation Manuals / How to remove the front door of your Optical Drive
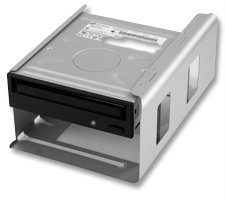
        optical drive installation
        Need more Speed?
        Wireless Devices
        Routers, Network Adapters, Bluetooth, Etc.
        Newer Technology
        MAXPower 802.11n/g/b Router
        from $30.00
        How to remove the front door of your Optical Drive
        ATTENTION!
        If you are installing an optical drive in any of these systems:
      • Power Macintosh G4 QuickSilver
      • Power Macintosh G4 QuickSilver 2002
      • Power Macintosh G4 "Mirrored Drive Door"
      • Power Macintosh G4 "FireWire 800"
      • Power Macintosh G5 (all models)
      • Mac Pro (all models)

        You will need to remove the front door to allow the tray to exit the computer properly.
        This is identical to the existing drive mechanisms installed in those systems.

        1. Eject the drive tray
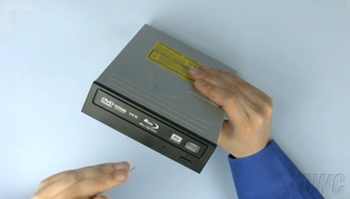
        Simply use a paperclip to manually eject the drive tray using the emergency eject hole on the front of the drive bezel.

        2. Pull the drive tray open
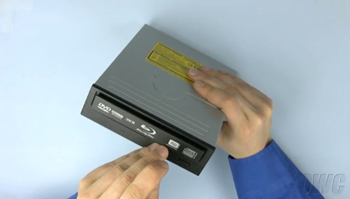
        Gently pull the drive tray open and turn it upside down.

        3. Releasing the drive bezel
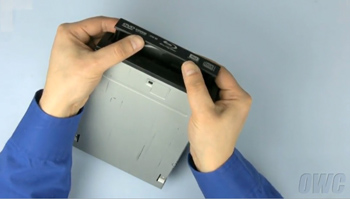
        Hold you thumbs a quarter way in from each end on the lip that you'll feel at the tip of the drive tray.
        Press away from yourself and down you should feel the bezel lift off the tray and it will slide off.
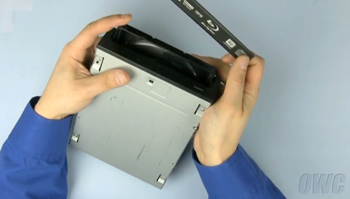
        Slide the drive tray back into the unit and you may now install the drive into your system.

      • Helpful Links
        • About Us
        • DIY Install Videos
        • Join our Affiliate Network
        • Where to Buy (opens in a new tab)
        • Accessibility Statement
        • Sustainability is Good Business
        • Join the MacSales.com Team
        • Media+Newsroom
        • Privacy Promise
        • MacSales.com for Business
        Join the MacSales.com Newsletter

        Join hundreds-of-thousands of tech enthusiasts across the planet and gain access to specials, clearance, and holiday savings on the OWC upgrades, drives, and docks everyone loves.

        Newsletter Subscription

        Please enter a valid email address.

        • bbb
        © 2000-2026 Other World Computing, Inc., All Rights Reserved. Site Terms Guest ID:
        Your Privacy Choices
        This item has been added to your cart